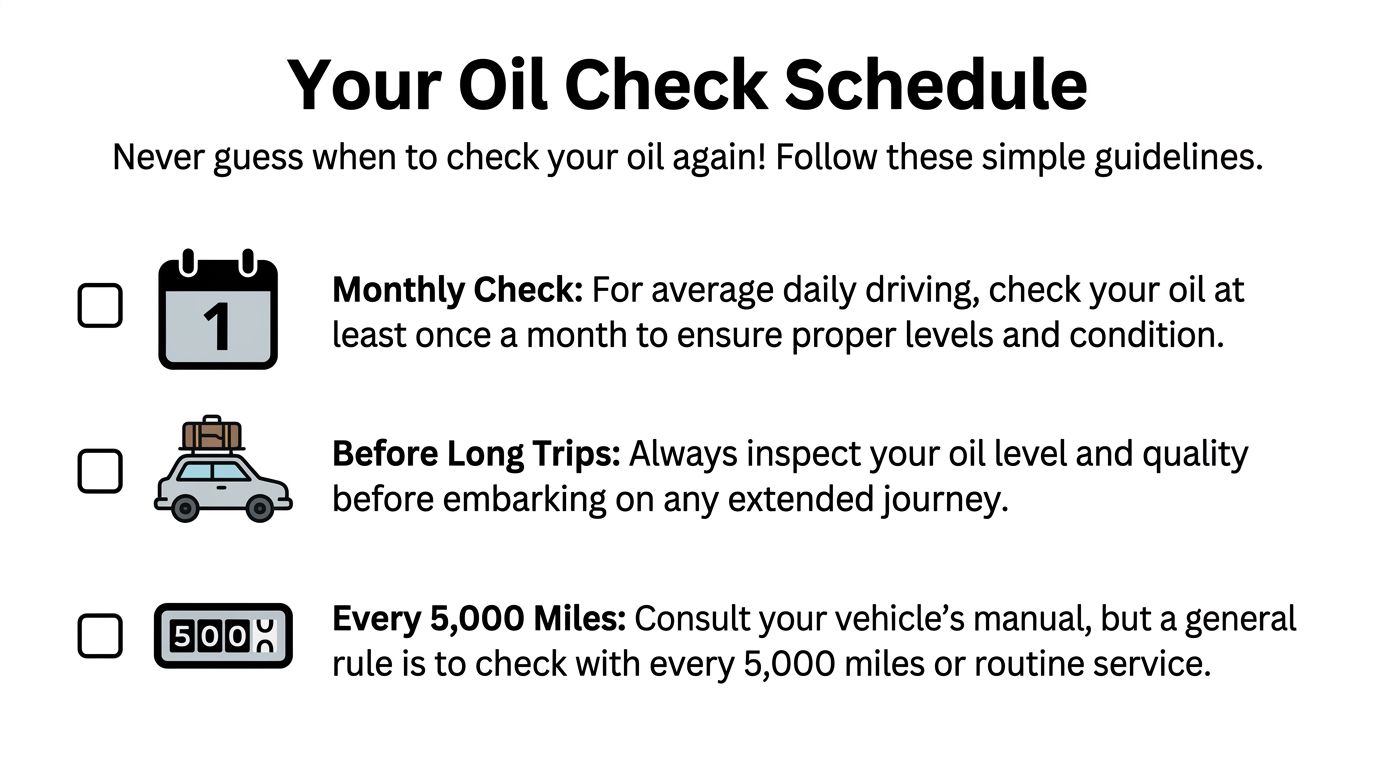
Generally, you should check your oil at least once a month and every 1,000 miles, and always before a long road trip. For the most accurate reading, check it when the engine is cold, parked on level ground, though some mechanics also prefer a warm check 5 to 15 minutes after shutdown in certain cases.
You’re probably here for a practical reason. Maybe you’re packing for a road trip, noticing your oil light came on recently, or standing in a parking lot thinking, “When should i check my oil, and am I supposed to do it now or later?”
That question is more common than is often acknowledged. A lot of drivers can handle traffic, weather, and busy schedules just fine, but feel unsure the moment they open the hood.
The good news is that checking your oil is simple. It’s one of those small habits that gives you a lot back: fewer surprises, fewer roadside problems, and more confidence every time you drive.
Your Guide to a Simple and Essential Car Habit
Think of an oil check like looking at your shoes before a long walk. You don’t need to be an expert. You just want to know whether you’re ready to go.
That’s why smart drivers build oil checks into normal life instead of waiting for a warning light. A quick look once a month, plus a check before a longer drive, can help you catch a low level, dirty oil, or signs of a leak before they turn into something stressful.
This matters even more in Florida. Heat, traffic, long highway stretches, and stop-and-go driving all put extra strain on a vehicle. If your car is older, used for commuting, or regularly carries passengers and cargo, paying attention to oil becomes even more valuable.
Simple habit: Put “check oil” on the same mental list as “check fuel” and “check tires” before a trip.
If you’ve never done it before, don’t worry. You’re not behind. You’re learning a skill many experienced drivers were never clearly taught.
Why Checking Oil is a Core Defensive Driving Skill
Many understand defensive driving as watching mirrors, leaving space, and avoiding distractions. That’s true. But it also means reducing the chance that your own vehicle creates a hazard.
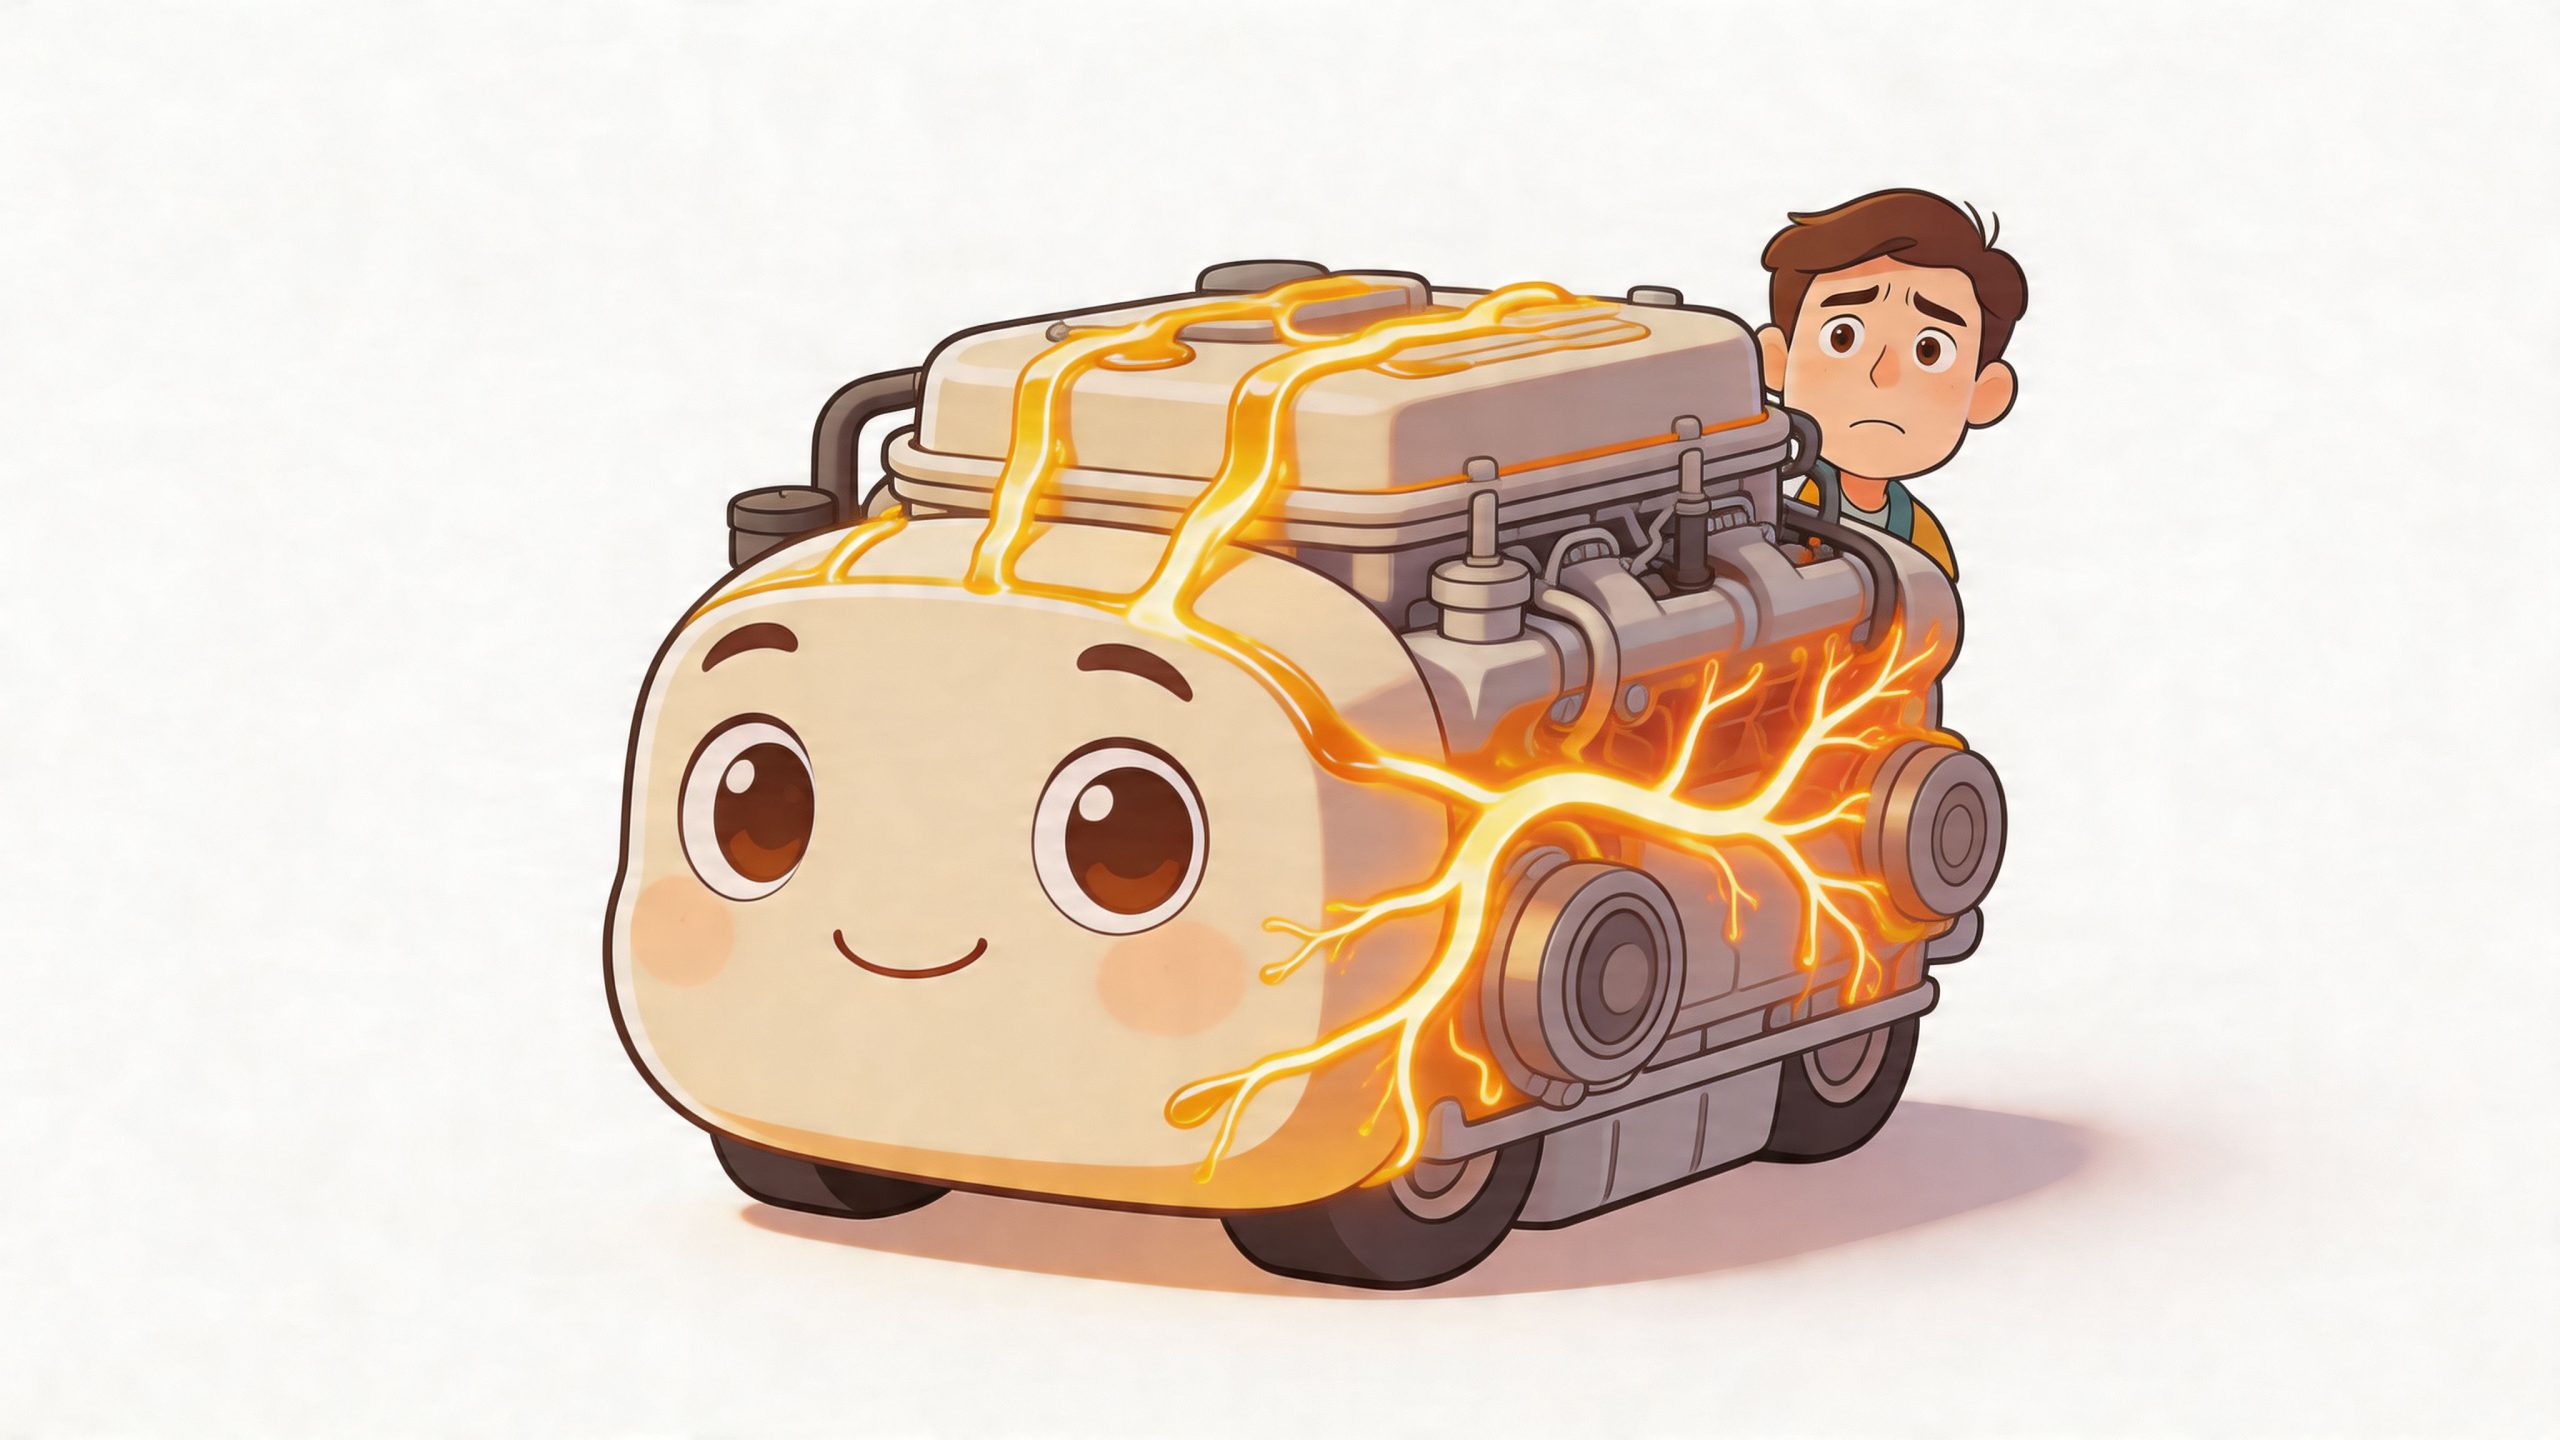
Low oil can do exactly that. If the engine loses enough lubrication, parts rub harder, heat builds, and the vehicle can quit when you need it most. That’s not just a repair issue. It can become a safety issue on a ramp, at an intersection, or in fast-moving traffic.
Oil does more than most drivers realize
A simple way to remember engine oil’s job is to think of it as the engine’s lifeblood.
It helps with three basic tasks:
- Lubrication: It separates moving metal parts so they don’t grind against each other.
- Cooling: It carries heat away from critical engine areas.
- Cleaning: It helps trap dirt and debris so contamination doesn’t keep circulating.
When oil is low, dirty, or breaking down, each of those jobs gets harder. The engine has to work with less protection.
Why timing matters
The clearest guidance is to check oil when the engine is cold so the oil has time to drain back into the pan for a more accurate reading. Low oil contributes to about 15% of catastrophic engine seizures annually, with repair costs averaging $4,000 to $7,000, according to Oil Changers.
That’s one reason vehicle awareness belongs right alongside scanning traffic and anticipating other drivers. A breakdown you prevent is a risk you never have to manage.
If you think of defensive driving as “avoiding preventable trouble,” routine oil checks fit naturally into that mindset. The same logic behind safe spacing and early braking also supports basic maintenance awareness. If you want to sharpen that broader mindset, these defensive driving techniques connect vehicle readiness with what happens on the road.
A safe driver doesn’t just react well. A safe driver also avoids predictable problems before the key even turns.
The Recommended Schedule for Checking Your Oil
If you want one easy routine, use this: check your oil monthly and before any long trip.
If you track mileage more closely than dates, a common guideline is every 1,000 miles or at least monthly, based on recommendations summarized by AutoZone. That same guidance says checks should become more frequent in hard use, including towing and extreme heat. In conditions like Florida’s 90°F+ summers, oil can break down 50% faster.
A practical schedule most drivers can follow
Here’s a simple way to match the habit to your driving life.
| Driving Condition | Recommended Check Frequency |
|---|---|
| Average daily driving | Monthly |
| Drivers who track mileage closely | Every 1,000 miles |
| Before a road trip | Check before leaving |
| Towing or hauling | Weekly or bi-weekly |
| Frequent driving in extreme heat | Weekly or bi-weekly |
| Older vehicle or high oil use | More often, based on your pattern |
That last line matters. Some engines naturally use oil between changes. If your vehicle has a history of needing top-offs, don’t wait for a calendar reminder.
When to check more often
Some drivers need a tighter routine than others.
- Heavy use: If you tow, haul, or spend lots of time in stop-and-go traffic, check more often.
- Hot weather: Long drives in strong heat can be tougher on oil.
- Older cars: A higher-mileage vehicle may use oil gradually even if it still runs fine.
- Pre-trip prep: Before a highway trip, check oil, tires, lights, and fluids together.
If you’re not sure whether your oil is just aging or showing warning signs, this guide on 8 Signs Your Car Needs an Oil Change is a useful companion.
For a broader checklist mindset, good maintenance habits support safer travel in the same way traffic awareness does. This overview of Florida vehicle maintenance is a helpful reminder that road safety starts before you pull out of the driveway.
A Simple Step-by-Step Guide to Checking Your Oil
Checking oil for the first time can feel awkward. After you do it once or twice, it becomes routine.
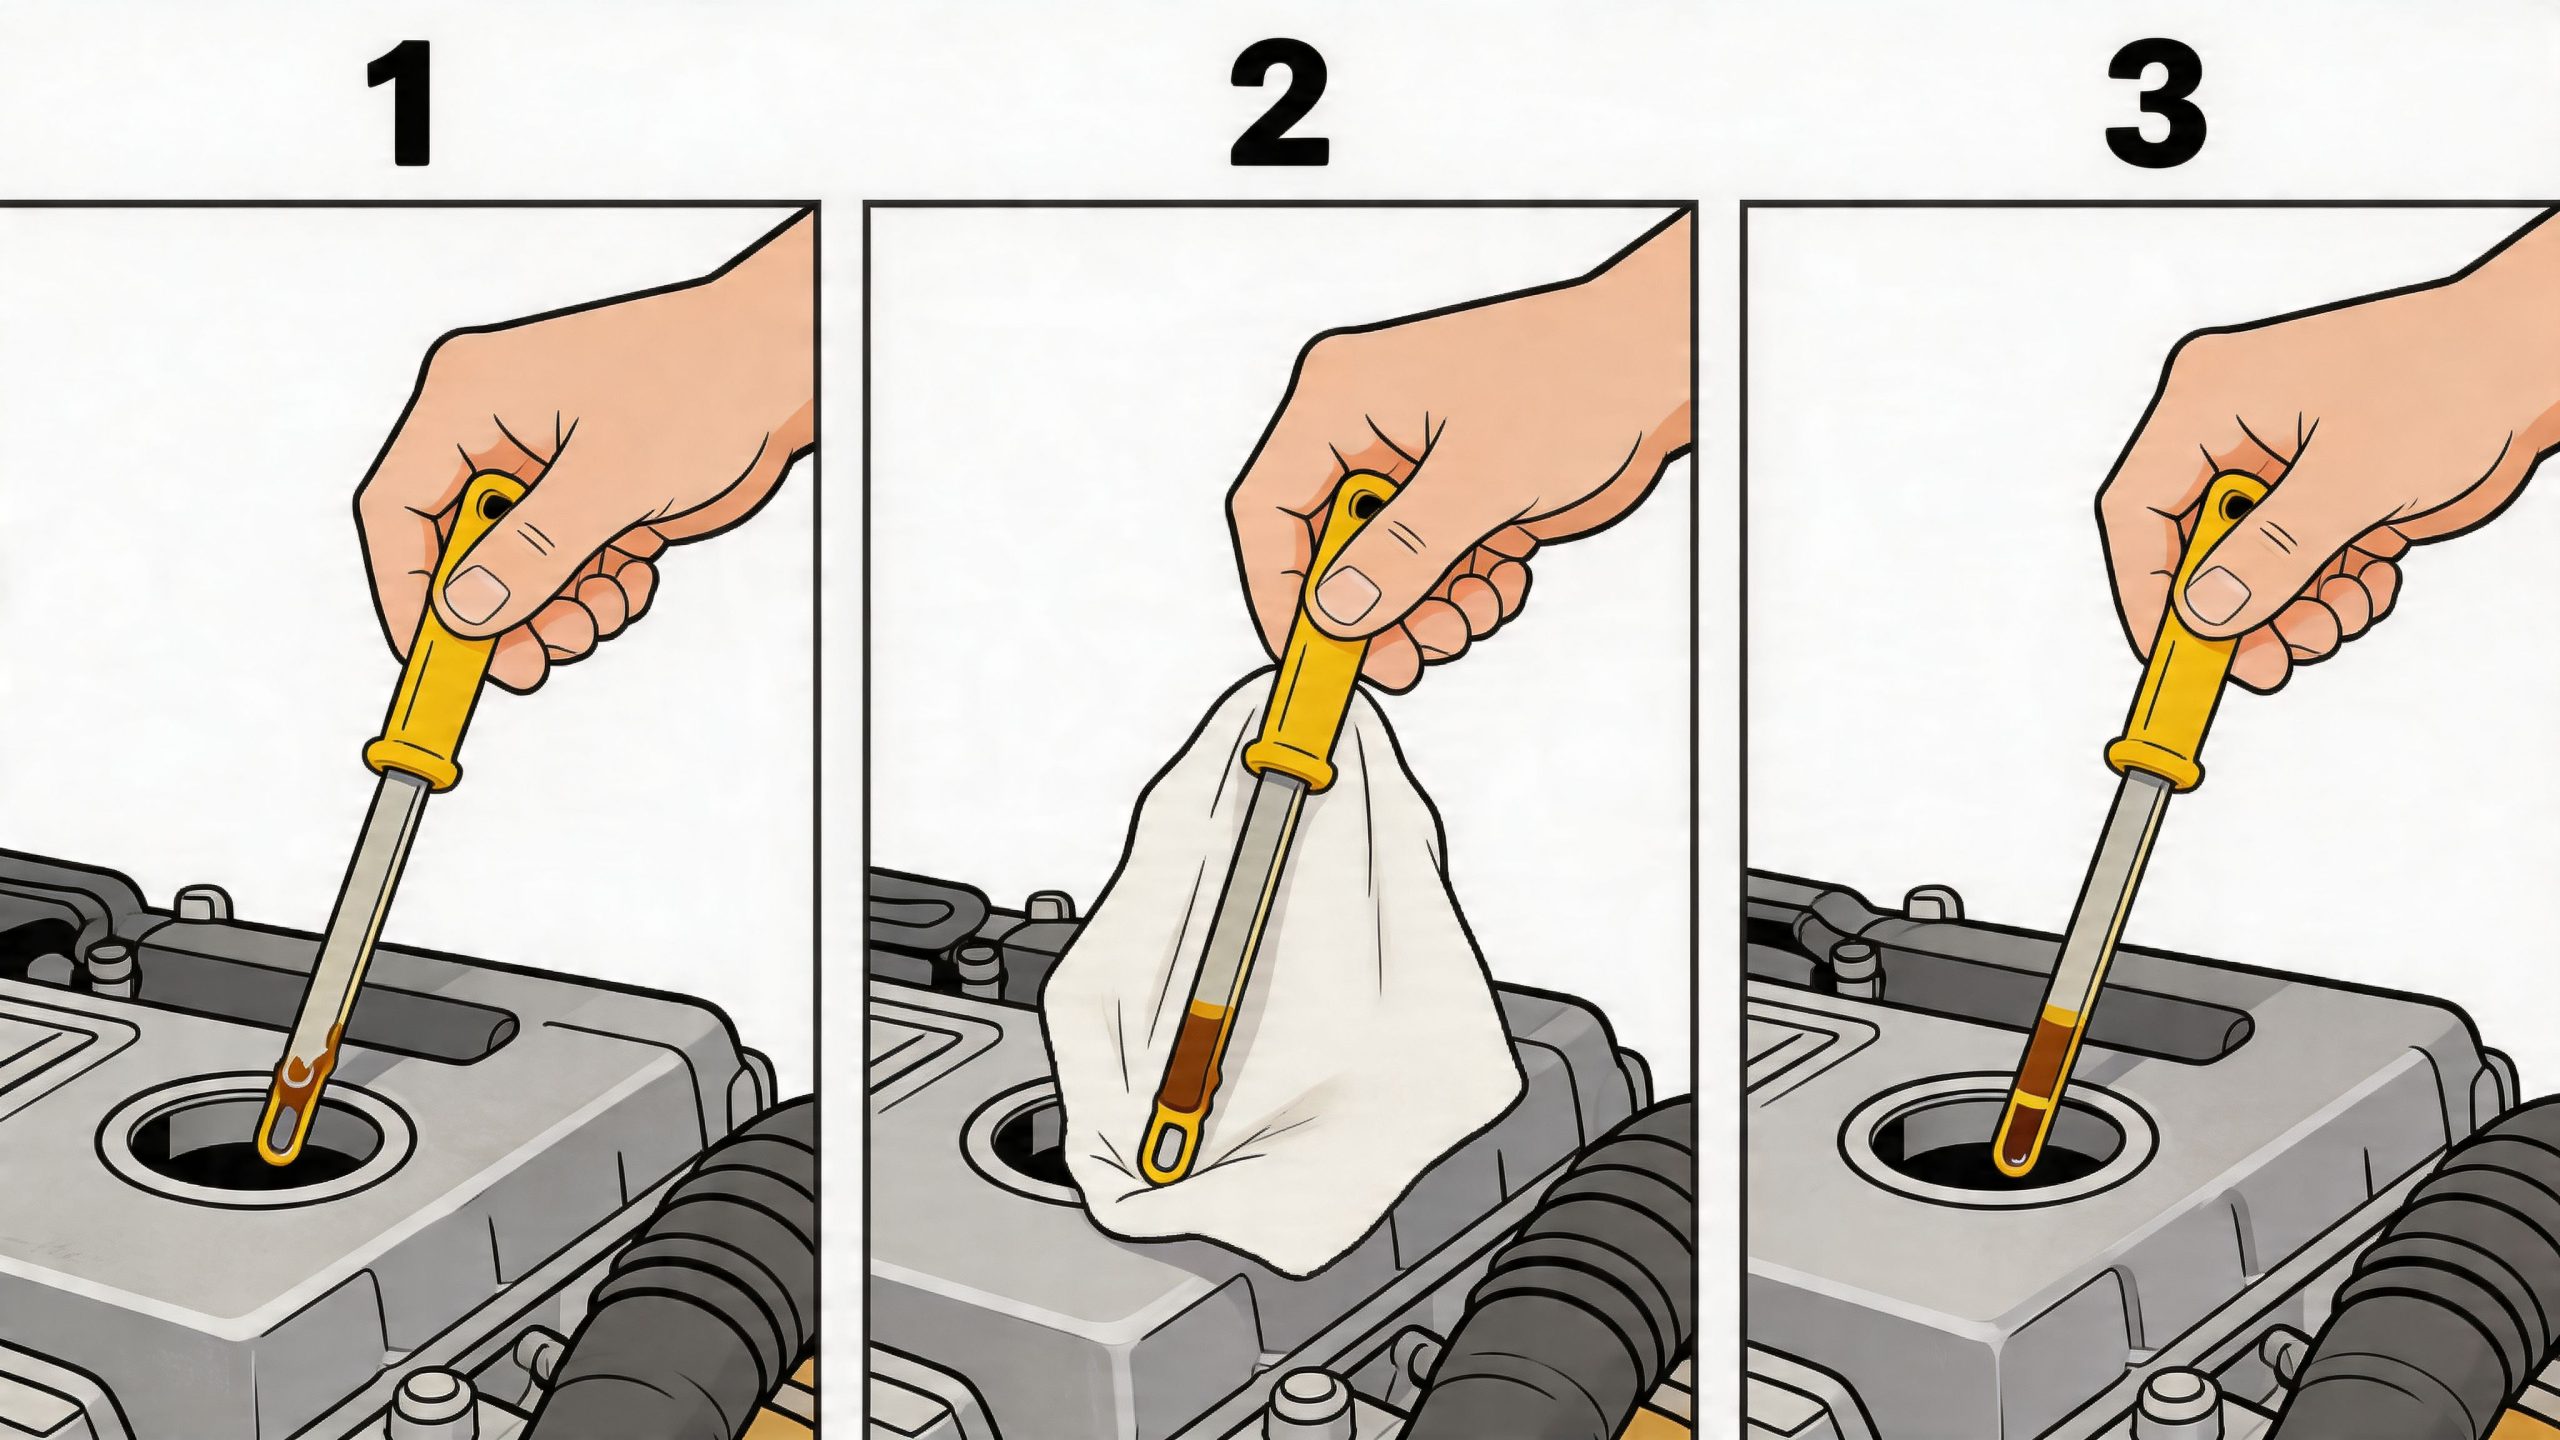
Start with the car parked on level ground. If the car is tilted, the reading can mislead you. Open the hood and locate the dipstick. It usually has a bright handle, often yellow or orange.
The basic wipe-and-dip method
Use this sequence:
- Pull the dipstick out and wipe it clean with a paper towel or clean rag.
- Insert it fully back in so it seats all the way.
- Pull it out again and read both the level and the appearance of the oil.
You’re looking for where the oil line falls between the marked range. Depending on the car, that might say “Full” and “Add,” or it may use dots, lines, or a hatched area.
If the level is near the lower mark, add the correct oil type in small amounts. Don’t dump in a large amount at once. Add a little, wait, and recheck.
Practical rule: It’s easier to add a bit more oil than to remove too much.
Cold check or warm check
Here, many drivers get confused.
Most mainstream advice says to check oil when the engine is cold, after the vehicle has sat for several hours or overnight. That gives the oil time to drain into the pan, which makes the reading easier to trust.
But there is also a real, more nuanced view from some experienced technicians. Some mechanics and manufacturers prefer checking oil warm, after the engine has reached operating temperature and then sat for 5 to 15 minutes. This approach is discussed in this video from The Car Care Nut, which explains why a warm reading may better reflect oil distribution in certain engines and may help avoid overfilling.
That doesn’t mean the cold-check method is wrong. It means you should know your vehicle and follow the owner’s manual if it gives a specific procedure.
Here’s the simplest way to decide:
- Use a cold check if you want the most widely recommended, straightforward reading.
- Use a warm check if your manual or a trusted technician says your engine is designed to be checked that way.
- Stay consistent: Compare readings using the same method each time so you can spot changes.
If you’d like another beginner-friendly walkthrough with photos, this step-by-step guide on how to check engine oil is useful.
A quick visual can also make the process feel less intimidating:
A few mistakes to avoid
A lot of oil-check frustration comes from small mistakes, not hard mechanics.
- Checking on a slope: Even a slight incline can distort the reading.
- Skipping the wipe step: The first pull often splashes oil up the dipstick tube.
- Reading one side only: Check both sides of the dipstick if the mark looks unclear.
- Overfilling: Too much oil can create foaming, which reduces lubrication quality.
If your reading seems strange, wait a bit and test again. One calm recheck is better than guessing.
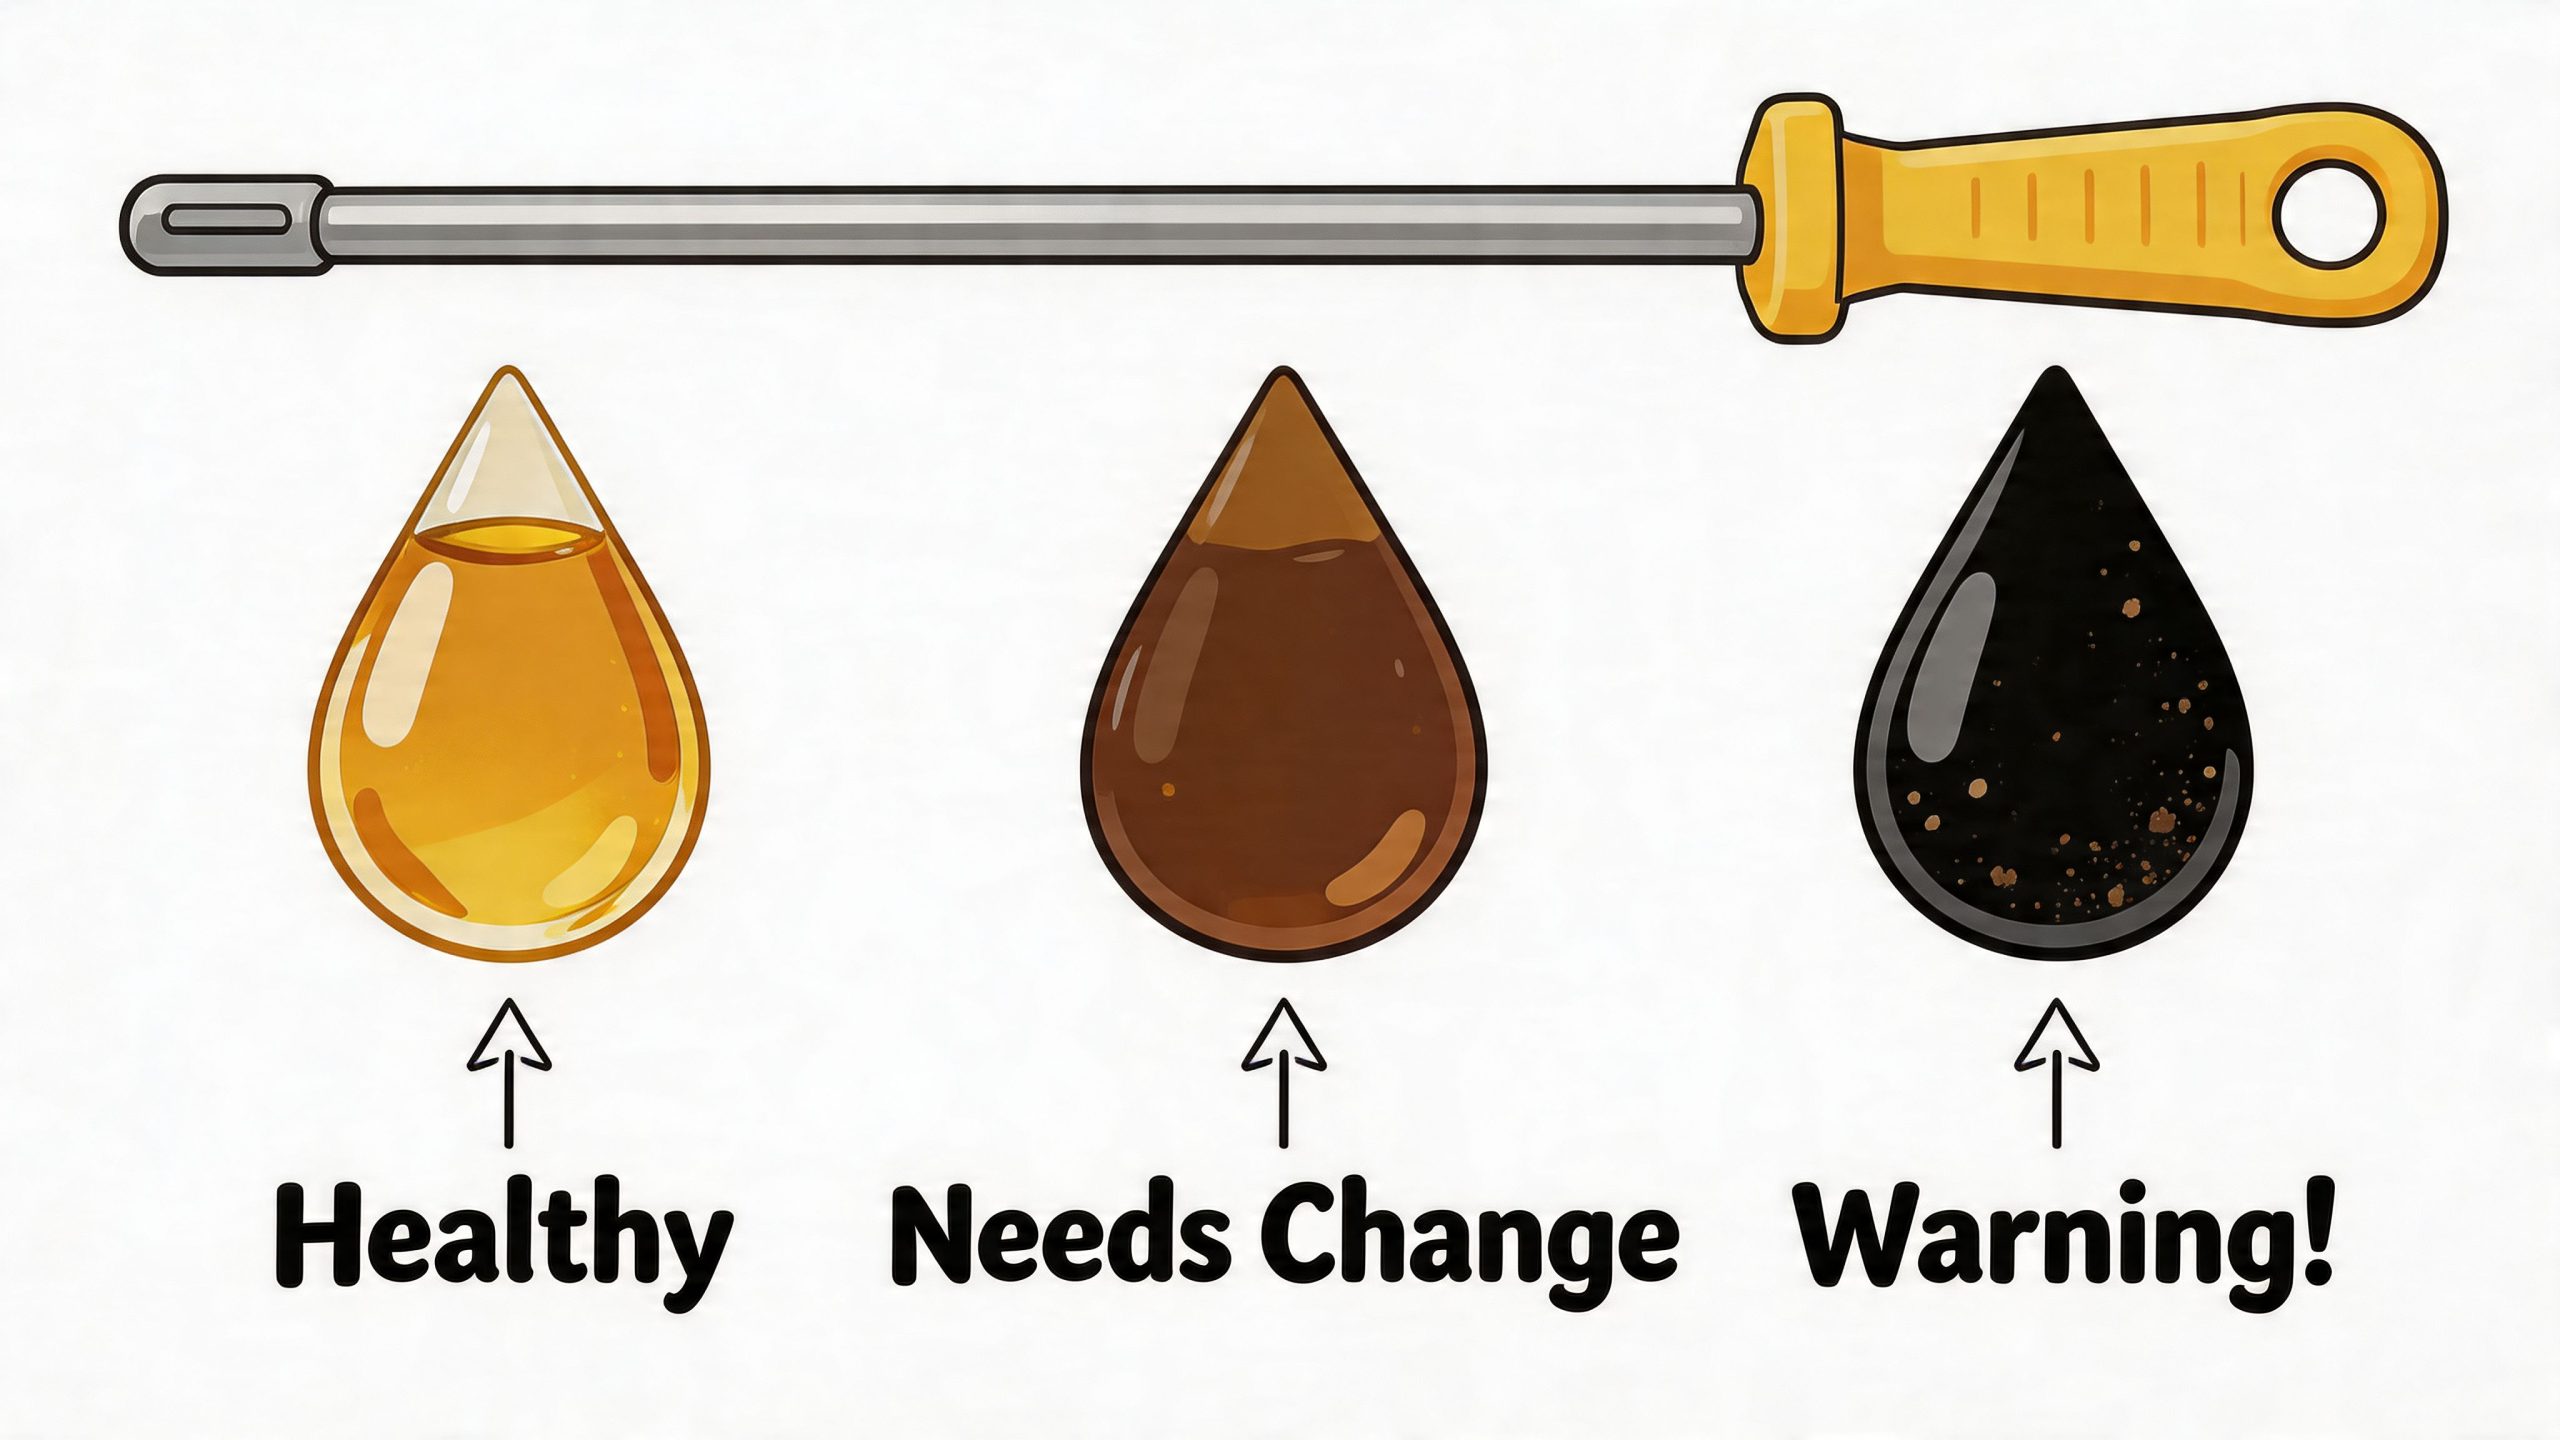
How to Interpret What Your Dipstick is Telling You
A dipstick doesn’t just say “enough” or “not enough.” It also gives you clues about what’s happening inside the engine.
That’s useful because some oil problems build subtly. The engine may still sound normal while the dipstick is already warning you.
What normal can look like
Fresh or healthy oil often looks amber and smooth. Used oil may look darker and still be normal, especially if it has some miles on it.
The key is not to panic over color alone. Instead, look at the full picture:
- Level: Is it within the marked range?
- Texture: Does it feel smooth, not gritty?
- Appearance: Does it look like oil, not like a milkshake or muddy coffee?
Warning signs on the dipstick
Some readings deserve quick attention. According to CarParts.com, normal oil consumption can be up to 1 quart per 1,000 to 2,000 miles depending on the manufacturer. The same source notes that milky oil may indicate a coolant leak, and oil starvation can drop pressure below 10 psi at idle, which can lead to accelerated wear and seizure. It also notes that this type of condition has been linked to 15% to 25% of premature engine failures in some models.
Use the dipstick as a basic translator:
- Low but clean oil: You may need to top it off and monitor usage.
- Very low oil: Stop treating it as a minor chore. Find out why it’s low.
- Milky oil: This is a red flag. Coolant may be getting into the engine.
- Foamy oil: The engine may be overfilled, or the oil may be aerated.
- Gritty or metallic feel: Internal wear may be present.
If the dipstick shows a sudden change from your car’s normal pattern, trust the change, not your hope.
Build a personal baseline
One of the smartest habits is to notice your car’s normal behavior over time.
If your vehicle usually stays near full for weeks and suddenly drops, that matters. If it normally uses a little oil between changes, that pattern helps you judge what’s normal for your engine.
You don’t need perfect mechanical knowledge. You just need consistency.
Red Flags That Mean It’s Time to See a Mechanic
Some oil issues are bigger than a simple top-off. If you notice clear warning signs, get professional help instead of trying to reason your way past them.
Watch for these:
- Oil pressure warning light stays on: Don’t assume the sensor is wrong.
- Blue smoke from the exhaust: The engine may be burning oil.
- Knocking or ticking sounds: Internal parts may not be getting proper lubrication.
- Oil spots under the car: A leak can turn a manageable issue into a roadside breakdown.
- Milky oil on the dipstick: This can point to coolant contamination.
- You keep adding oil often: Repeated low readings usually mean there’s an underlying problem.
If the engine is making noise or the oil warning light is on, driving farther can make the damage much worse. In a true on-road emergency, staying calm matters just as much as acting fast. This guide on what to do when brakes fail is about a different problem, but the same principle applies: recognize danger early, then respond with a clear head.
Don’t wait for certainty when the signs are serious. Get the car checked.
Drive Confidently with This Essential Safety Habit
A lot of drivers ask when should i check my oil because they think there must be a complicated answer. Usually, there isn’t.
The practical routine is simple. Check it monthly, check it before long trips, and check it the right way on level ground. Learn what your dipstick markings mean, and pay attention if the oil looks unusual or the car starts showing warning signs.
That habit isn’t just about protecting the engine. It supports safer, calmer driving because you’re less likely to deal with a preventable breakdown in traffic.
Confident drivers don’t know everything. They know the few simple habits that prevent bigger problems. This one belongs on that list, right next to scanning ahead, leaving space, and practicing ways to avoid car accidents.
If you want to build more safety habits like this one, BDISchool offers Florida-approved online courses that help drivers become more aware, responsible, and confident on the road. Whether you’re refreshing your skills after a citation or want to drive smarter, their training makes practical defensive driving easier to understand and apply.